Black Screen Of Death
A guide for you to escape GRUB Rescue just in case you ended up there
Pretext
Once upon a time we had legacy GRUB, the Grand Unified Linux Bootloader version 0.97. Legacy GRUB had many virtues, but it became old and its developers did yearn for more functionality, and thus did GRUB 2 come into the world.
whatever the history, the grub rescue is one of the problems which linux users encounter in their lives.The reasons might vary and the solutions too.. you might have tried to skip the warning which is grub bootloader couldnt be installed properly and ended up there or you might have tried to dualboot windows and linux and after using it for sometime, you tried to uninstall linux by deleting the linux partition we will try to figure out the solution for your problem together
What Caused it?
GRUB 2 is a major rewrite with several significant differences. It boots removable media, and can be configured with an option to enter your system BIOS. It’s more complicated to configure with all kinds of scripts to wade through, and instead of having a nice fairly simple /boot/grub/menu.lst file with all configurations in one place, the default is /boot/grub/grub.cfg. Which you don’t edit directly, oh no, for this is not for mere humans to touch, but only other scripts. We lowly humans may edit /etc/default/grub, which controls mainly the appearance of the GRUB menu.
We may also edit the scripts in /etc/grub.d/. These are the scripts that boot your operating systems, control external applications such as memtest and os_prober, and theming./boot/grub/grub.cfg is built from /etc/default/grub and /etc/grub.d/* when you run the update-grub command, which you must run every time you make changes.
The good news is that the update-grub script is reliable for finding kernels, boot files, and adding all operating systems to your GRUB boot menu, so you don’t have to do it manually.
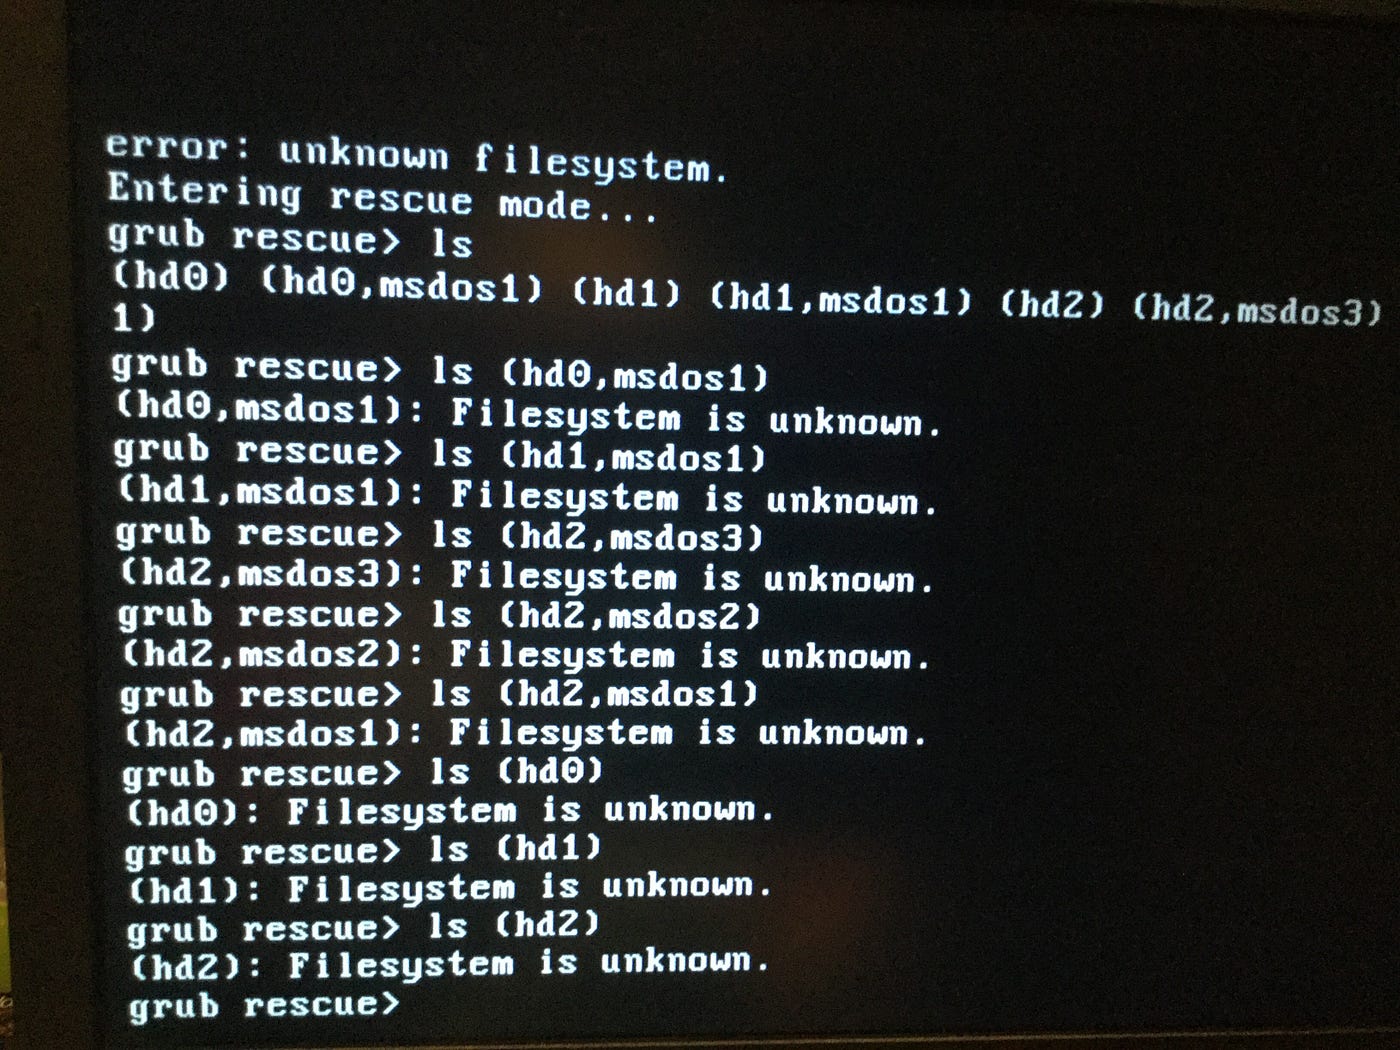
We’re going to learn how to fix two of the more common failures. When you boot up your system and it stops at the grub> prompt, that is the full GRUB 2 command shell. That means GRUB 2 started normally and loaded the normal.mod module (and other modules which are located in /boot/grub/[arch]/), but it didn’t find your grub.cfg file. If you see grub rescue> that means it couldn’t find normal.mod, so it probably couldn’t find any of your boot files.
Booting From grub>
This is not actually the toughest problem.It can be solved easily and is quite easier than from grub rescue.
This is how to set the boot files and boot the system from the grub> prompt. We know from running the ls command that there is a Linux root filesystem on (hd0,1), and you can keep searching until you verify where /boot/grub is. Then run these commands, using your own root partition, kernel, and initrd image:
1
2
3
4
5
grub> set root=(hd0,1)
grub> linux /boot/vmlinuz-3.13.0-29-generic root=/dev/sda1
grub> initrd /boot/initrd.img-3.13.0-29-generic
grub> boot
the first line sets the partition that the root filesystem is on. The second line tells GRUB the location of the kernel you want to use. Start typing /boot/vmli, and then use tab-completion to fill in the rest. Type root=/dev/sdX to set the location of the root filesystem. Yes, this seems redundant, but if you leave this out you’ll get a kernel panic. How do you know the correct partition? hd0,1 = /dev/sda1. hd1,1 = /dev/sdb1. hd3,2 = /dev/sdd2. I think you can extrapolate the rest.
The third line sets the initrd file, which must be the same version number as the kernel.
The fourth line boots your system.
On some Linux systems the current kernels and initrds are symlinked into the top level of the root filesystem:
1
2
3
4
5
6
7
8


$ ls -l /
vmlinuz -> boot/vmlinuz-3.13.0-29-generic
initrd.img -> boot/initrd.img-3.13.0-29-generic
So you could boot from grub> like this:
1
2
3
4
5

grub> set root=(hd0,1)
grub> linux /vmlinuz root=/dev/sda1
grub> initrd /initrd.img
grub> boot
Booting From grub-rescue>
If you’re in the GRUB rescue shell the commands are different, and you have to load the normal.mod andlinux.mod modules:
1
2
3
4
5
6
7
8
grub rescue> set prefix=(hd0,1)/boot/grub
grub rescue> set root=(hd0,1)
grub rescue> insmod normal
grub rescue> normal
grub rescue> insmod linux
grub rescue> linux /boot/vmlinuz-3.13.0-29-generic root=/dev/sda1
grub rescue> initrd /boot/initrd.img-3.13.0-29-generic
grub rescue> boot
Tab-completion should start working after you load both modules.
Fixing it permanently:
When you have successfully booted your system, run these commands to fix GRUB permanently:
1
2
3
4
5
6
7
8
9
10
11
12
13
14
15
16
17
18
# update-grub
Generating grub configuration file ...
Found background: /usr/share/images/grub/Apollo_17_The_Last_Moon_Shot_Edit1.tga
Found background image: /usr/share/images/grub/Apollo_17_The_Last_Moon_Shot_Edit1.tga
Found linux image: /boot/vmlinuz-3.13.0-29-generic
Found initrd image: /boot/initrd.img-3.13.0-29-generic
Found linux image: /boot/vmlinuz-3.13.0-27-generic
Found initrd image: /boot/initrd.img-3.13.0-27-generic
Found linux image: /boot/vmlinuz-3.13.0-24-generic
Found initrd image: /boot/initrd.img-3.13.0-24-generic
Found memtest86+ image: /boot/memtest86+.elf
Found memtest86+ image: /boot/memtest86+.bin
done
# grub-install /dev/sda
Installing for i386-pc platform.
Installation finished. No error reported.
When you run grub-install remember you’re installing it to the boot sector of your hard drive and not to a partition, so do not use a partition number like /dev/sda1.
What if it didn’t work:
Then, sorry mate.. You might have messed up your system so badly that it needs reinstallation or you could try the Super GRUB2 live rescue disk . The official GNU GRUB Manual 2.00 should also be helpful.